With both the business world and private consumers relying on VoIP technology for phone service, new options are continuously surfacing in this market as a result. Though hosted services are popular because of the promise of a "worry free" design, on-premise PBX software tends to be less expensive for the same amount of features.
There are many PBX software solutions available to those interested in creating their own on-premise phone system. One such system is known as "PBX in a Flash". In our PBX in a Flash install guide below we will walk you through all of the steps necessary in achieving a successful installation of this popular open source software.

What is PBX in a Flash (PIAF)
The PBX in a Flash software stands out as a unique compilation of open source, Internet communication technologies compared to other systems in the market. Unlike other systems where a team of people supports the platform, PIAF is mostly the result of hard work by two primary people: Ward Mundy and Tom King. The user community is small compared to other Asterisk based communities however, this ultimately works to the users advantage as more focus is directed at pertinent issues.
The PIAF site has a "home brew" feel (as does Mundy’s main site, Nerd Vittles) but the system appears to be quite solid once it is up and running. Initially I decided to write this guide to kick the tires on the actual PBX application but as I tried to install the system I was presented with numerous challenges, primarily due to software errors. For this reason I decided to focus this guide primarily on the installation side since it appears to be much more time consuming than other PBX software I have used in the past.
Once the system finally installed properly, the charm and power of the software became very evident. It is worth noting here that the actual PBX software relies on FreePBX, and for this reason, since we already have a guide for FreePBX it is best to review that guide should you wish to kick the tires on the actual software.
Why Choose PIAF over its Competitors?
This is a actually a valid question, after all, the installation can be problematic and it uses FreePBX software so why not just go with FreePBX from the start? Well, if you are looking for a system to simply make calls, consider using FreePBX as it is one of the easiest systems to install and configure. However, if you plan on taking your communication system to the next level, PIAF may be the ideal solution for you.
One of the most remarkable parts of the system is Incredible PBX. This free package from the makers of PIAF comes with several add-ons from enhanced security features (i.e. VPN support, Travelin' Man for secure remote access), OpenFire – an instant messaging service allowing users to send text messages between devices, Google Voice support and many others.
Considering some of the extras, this system is one of the most powerful you can find. Whereas some systems require payment to add modules for extended functionality, this is all free. However, those that use the system should consider making a donation to the small team of people who built this great system.
Convinced PIAF is the PBX platform you need? Okay let's dive into our installation guide.
Preparing to Install PIAF
It is necessary to dedicate a single PC for your PBX on the Local Area Network (LAN) where your phones and softphones will reside. Though it is possible to connect devices from outside networks the focus of this article will only serve to connect devices on the same network as the system. In figure 1, you can see a snapshot of the hardware components within my machine:
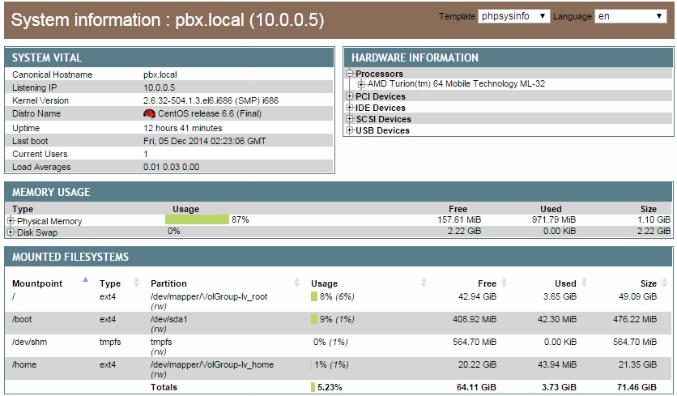
Figure 1: System Components
This is a common topic on discussion boards and forums over the web. My machine is relatively old and uses a single core AMD CPU rated at about 1.79 GHz, 1 GB of RAM and just over 70 GB of storage space. This is all that is required for a small network – such a system can easily power a small office of around 10 users.
If repurposing an older machine, now would be a good time to backup any data as the machine will be wiped during the installation of the underlying operating system.
Installing PBX in a Flash
There are many ways to perform the PBX in a Flash download and indeed there are many distributions available from torrents on the web but these will not work in every scenario. If you have a torrent client such as BitTorrent or µTorrent, you can acquire the file by following a download link on the PIAF download page. If it works (which none did for me) you can skip the Operating System (OS) and software installation part of this guide.
It will be necessary to acquire an image for CentOS to be used for the underlying operating system of PIAF. Download the minimal ISO image for your preferred setup (32 bit is safest) and burn the image to disc. Boot to the disc on your machine and follow the next steps carefully.
Setting up CentOS
The first screen you will see should look similar to figure 2 below. Make sure the machine is connected to the Internet then pick the first option to continue.
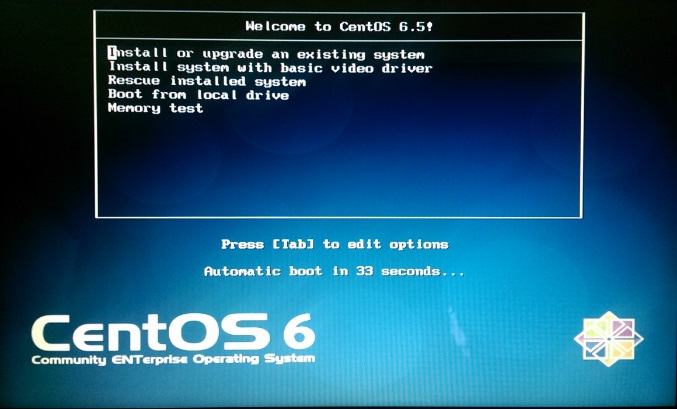
Figure 2: CentOS Installation Splash Screen
After a moment or so, the installation wizard will load. A short series of steps must be completed in order to install the OS before PIAF can be loaded.
- Disc Found - This is much like a chkdsk scan performed by Windows (fsck in Linux.) If you want the disk scanned before the installation, feel free to select Ok, otherwise select Skip.
- Select Language - After skipping past another splash screen, the language for the install process must be selected.
- Keyboard Input - It would be best to select the layout matching the language selected in the previous step.
- Storage Selection - In this guide, we will be using the local storage on the machine so select the top option.
- Type of Install - We will be performing a fresh install to replace whatever was previously installed on the disk so pick the top option.
- Hostname - Leave this as the default string localhost.localdomain as this is the most practical setting for this guide. Next, click the button in the lower left hand corner that reads Configure Network. Make sure both boxes at the top are selected, click Apply then continue to the next step.
- Time Zone Selection - Pick the closest city in your time zone and continue.
- Root Password - Unlike other systems, we will be installing the system from the command line in the OS so make sure to remember the password created in this step.
- Type of Install - Some will argue that defining custom SWAP drive parameters is the best choice but for the sake of simplicity, select Use All Space.
Prepare for lengthy installation period! When this process finally completes, the computer should be rebooted (it may occur automatically) and will require additional priming via a short series of commands.
Without going into too much detail the next series of steps require a series of commands to be entered at the command line as follows. Login using the username root and supply the password you created earlier. Type in the commands exactly as seen in the following steps and press Enter. Note that all gaps between characters total a single space.
| The command sed is a stream editor and essentially edits the file defined with the values supplied. |
| sed -i 's|no|yes|' /etc/sysconfig/network-scripts/ifcfg-eth0 |
| This step may not be necessary. This command pulls up the NIC in the machine but it should already be activated because of selection made during the Hostname step above. |
| ifup eth0 |
| This modifies an operating module in the Linux kernel known as SELinux to a state allowing it to run and create logs but not control permissions. |
| setenforce 0 |
| Yellowdog Updater Modified (or YUM) is an automated update program – in this case, it tells the updater to choose "yes" as the answer for all options during the update. This portion of the install may take a while! |
| yum -y upgrade |
| This is another set of updates that installs networking tools known as net-tools. This should not take as long as the previous step. |
| yum -y install net-tools nano wget |
| The package installed in this step gives the system headers needed to compile kernel modules based on the kind of processor used in the system. |
| yum install kernel-devel-$(uname -r) |
The guide produced by Mundy includes a couple of additional steps but since we did not mess with partitioning, this is the extent of the prep work required for the OS. If you happened to define your own partitions, you can find the additional commands required in the middle of this Nerdvittles page. Type reboot to restart the machine and we will continue by applying the actual PIAF software to the machine.
Acquiring PIAF
Here, we will acquire and install the PBX in a Flash system by issuing a few short commands.
| This may not be necessary as root is usually the default directory entered after a reboot. However, it does not hurt to enter this command to move to the correct directory. |
| cd /root |
| The wget command simply downloads a file over the network. In this case, the file is located on a web server over the Internet. |
| wget http://pbxinaflash.com/piaf3-install.tar.gz |
| The file is downloaded as a compressed version of itself – in a basic sense, this command extracts the file. |
| tar zxvf piaf3-install.tar.gz |
| The final step installs the software to the machine. |
| ./piaf3-install |
Initial Configuration of PBX in a Flash
If all goes well, the machine should restart and a screen will appear showing the IP of the machine and present you with an option to continue the installation. Select option A and continue to the next step. You should see a screen that resembles figure 3 below.
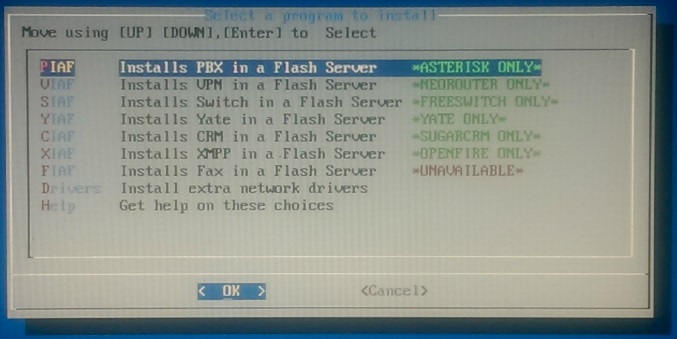
Figure 3: Choose the Product to Install
We are installing the actual PBX in a Flash software so leave the first option highlighted and select OK to continue. The following steps will finalize the installation of the PIAF software.
- Agreement - The next step is an agreement between you and the PIAF creators. Like most software, you simply need to agree that the company is not at fault for any damages caused by the software. If you accept the agreement you will move to the next step.
- Select a color - This is the version to be installed. The green version featuring Asterisk 11 is recommended so highlight it and select Ok to move forward.
- Enable advanced Asterisk configuration - A new wizard appears with a splash screen introducing the last few steps to be completed before the final phase of the installation. The first question asks to enable menuconfig. It will not be needed so press n and continue – prepare to confirm this decision on the next page by pressing y or the wizard will return you to this step if a selection is not made quick enough.
- Time Zone selection - PIAF wants to know your time zone much like when configuring CentOS. Follow the instructions on screen, select your time zone and continue to the next step.
- FreePBX version selection - The Asterisk interface used by the system relies on FreePBX. The best version at this time is 2.11.X – select this option and move to the final step.
- Password creation - You can either let the system generate a secure password that will be used to access the configuration area for FreePBX or create your own. After passing the splash screen for this step, enter the randomly generated code to acknowledge you agree to the statement. On the next page, it is best to select b and create your own password. Enter the password twice and proceed to the last screen.
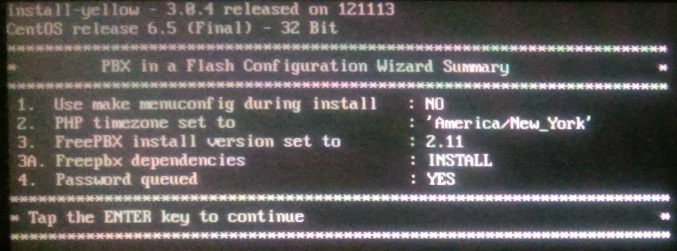
Figure 4: PIAF Confirmation Screen
You should see a screen similar to figure 4. I initially chose the yellow version and encountered a major issue so make sure you select green (at this time of writing this is version 3.0.4) to avoid making the same mistake. The time zone should match your current geographic location but everything else should be the same as the screenshot.
Press Enter to continue and it will install PBX in a Flash but be prepared for a lengthy installation process. Each time I had to reinstall the system due to errors made during previous attempts, the process took over 45 minutes so expect a lengthy wait before moving on to PBX configuration.
Accessing the software
Once the software finishes installing, you will be able to access the PBX in a Flash dashboard or console from a web browser on another machine within the LAN where PIAF is installed. Open your browser of choice and enter the local IP address of the machine. If everything went according to plan, the screen in figure 5 should appear.
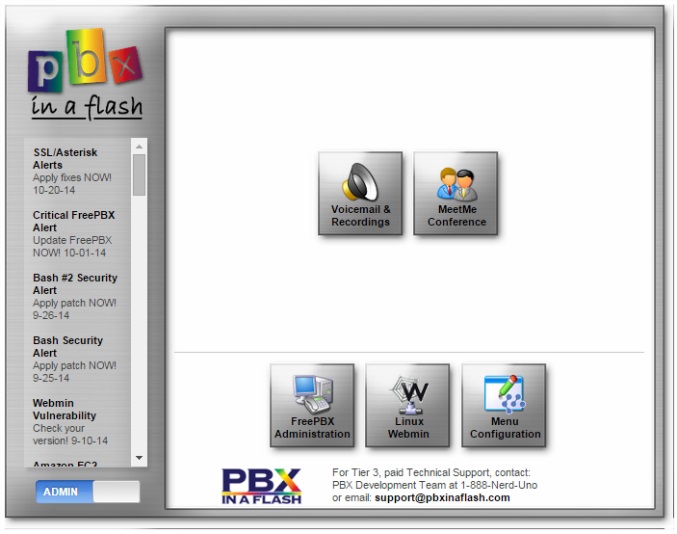
Figure 5: PBX in a Flash Dashboard
The core products will appear in this window in addition to any extra apps you may install down the road. You will need to move the slider seen in the lower left hand corner of the window to Admin in order to see all available applications – the most important of which is the FreePBX Administration console. Select this tile to continue to FreePBX where you will configure your system. Login using the username maint and the password you created at the end of the PIAF configuration.
The layout of this console is almost verbatim to the version covered in our FreePBX Setup Tutorial. Follow the link to read the guide to finish setting up your system. You will begin your configuration about midway through the guide, starting under the SIP and Additional VoIP Settings heading. All the necessary steps to create a basic functioning PBX are found here including steps to register with a SIP Trunk provider, in our case it was VoIP Innovations.
For extra instruction and configuration of inbound calling, read our Elastix Setup Guide. Pay attention to the areas surrounding figure 6 in this guide and everything below figure 8, ignoring the PEER Details shown in figure 10 as these are slightly different than what is shown in the FreePBX guide.
PBX in a Flash Final Thoughts
Early into this project, it seemed that the system would never function. However, after delving deeper into the installation process via the command line, it proved to be worth the time.
More than likely, this system will be the least appealing of the PBX software we have covered thus far, as the install is less automated compared to others on the market. With that said, the power of FreePBX combined with the tools for making detailed tweaks makes this a developers dream and the ideal system for anyone who wants a system with a true open source feel.
Like most other guides, this is just the surface yet it is enough to create a powerful calling system. We recommend PBX in a Flash for those with little fear of the unknown who want to take advantage of the powerful core features and great free add-ons for this system.
If you have any questions, feel free to send them our way using the comments form at the bottom of this page.

