- Online VoIP Comparisons since 2005
- 26.5+ Million page views: Testimonials
The Yealink CP860 is a versatile IP conference phone that will be at home in any small to medium sized conference room. Soft curves and sleek design make this phone a modern, stylish choice for any business.
Use the tabs below to navigate to various information options.
For this review we will be taking the Yealink CP860 conference phone for a test drive, giving our view of the good and bad, as well as installation and provisioning.
| OVERALL RATING | |||
| Performance | Installation | ||
| Voice Quality | Durability | ||
| Features | Ease of Use |
IP conference phones tend to be designed such that you know exactly what it is when you first set eyes on it. The Yealink CP860 is no different. The sleek lines and the gentle curves around the speaker area provide for an aesthetically pleasing device. The more I looked at it the more I liked it.
The CP860 is capable of up to 10 feet 360 degree voice pickup with the built-in 3 microphone array, making it a perfect option for the small to medium conference room (up to 20 feet in size). To improve voice pickup an expansion microphone option is available for those larger sized rooms. Up to two (2) expansion microphone modules can be connected. Optima HD voice, full duplex speakerphone technology, along with acoustic echo cancellation and background noise suppression provides for crystal clear voice calls.
The CP860 has one (1) VoIP account and includes many call features like call hold, mute, do not disturb, redial, call waiting, call forward, and call transfer. Four (4) softkeys are available to help with menu selections, as well as up/down arrows and OK keys. Volume adjustment is easy for both the ringing and speakerphone volumes by dedicated volume up/down keys. A mute button, a redial button, a standard 12 number/key dial pad, and an on-hook and off-hook button complete the main keypad.
Additional features include a USB 2.0 port that can be used for call recording (on to a connected USB storage device); a 3.5mm Jack port allowing you to connect a mobile or PC device for listening to audio and/or sharing a conference call; and the ability for up to a 5-way conference call. The dial pad section includes a 192x64-pixel graphical LCD display with backlight making it easy to navigate through the menu and features.
A setup wizard is included so that when you power up the phone you can follow on screen prompts. Phone configuration can also be achieved through a browser connection or auto-provision through your service provider (more information on this later).
Unlike some other popular manufacturers, the Yealink CP860 includes a power supply with the phone purchase. This is a small detail but one that can often cause delays when forgetting to order the power supply separately. This phone also supports Power over Ethernet (PoE).
Another small detail but one that I liked a lot was that the supplied Ethernet cable was 24 feet in length. This allows the phone to be positioned in the center of the room for best performance, almost independent of where the Ethernet port is in the room.
Even though the Ethernet cable supplied is 24 feet in length the power supply cord is only 10 feet in length. However, multiple outlets are typically available in a conference room so you should have one close enough (within 10 feet) for allowing the phone to be centrally located in the room. If not then an extension cord will solve the issue.
Even though you can get these for a reasonable (for a conference phone!) $350, it is still a significant outlay for a phone.
There is no built in IP switch like on many desk phones (for connecting a PC/laptop device). However, with multiple people in a meeting room having an extra Ethernet port may not be that much of an advantage! Having Wi-Fi available for the meeting attendees in the conference room will solve the issue.
The Yealink CP860 is not just a stylish, good looking conference phone. It provides crystal clear voice calls and good voice pickup in small/medium meeting rooms for a reasonable price. If you are in the market for a conference phone and considering Polycom options I would recommend that you take a closer look at this little gem.
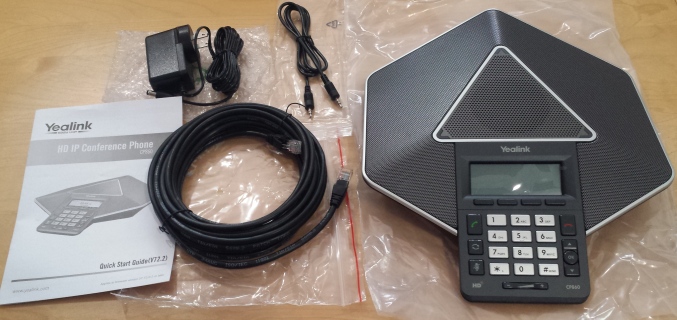
Figure 1: What comes in the box
Setup and installation of the CP860 is straight forward, with several configuration options: via a phone wizard, via a browser, or via auto-provision through your service provider. We will focus on configuration via the phone and the browser interface in this review.
Connect up the phone as described in the quick start guide. We always recommend connecting the power cable last. Once powered on the phone will start it's initialization process followed by some pleasant startup music. The first step of the setup wizard will appear on the LCD display (the language selection) as shown in Figure 2 below. Navigate through the wizard entering information for the following fields. Note that when you reach the "Account" information part (see Figure 3) that you need to use the down arrow key to navigate to all fields for provisioning the account.
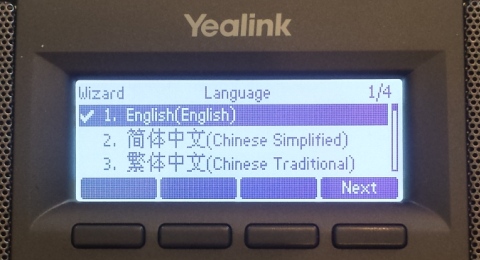
Figure 2: Phone Wizard - Step 1
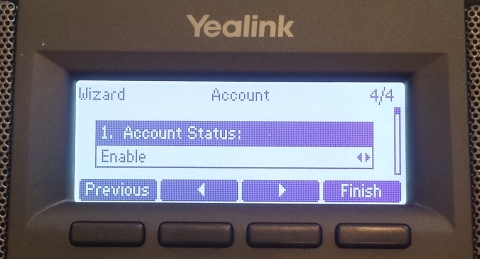
Figure 3: Phone Wizard - Account Information
Once you have completed all the relevant fields in the wizard you can press the softkey for "save" and then "finish". If set up correctly the phone will register with your PBX service provider. A small phone icon will show in the top left corner if it has registered successfully, as shown in Figure 4 below. If you do not have success with this method I recommend you try the following configuration method via a browser connection to the phone.
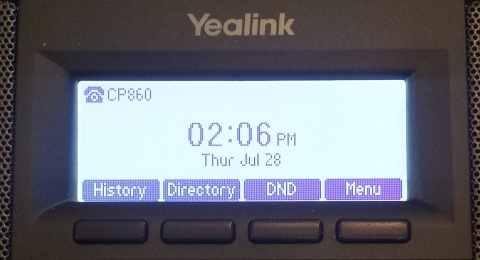
Figure 4: Successfully Registered Phone
With the phone connected as instructed in the quick start guide and powered on find the IP address of the phone by pressing the "OK" button. Go to your favorite browser and type in the phones IP address into the address bar of the browser and hit enter. If performed correctly you will see the login screen as shown below.
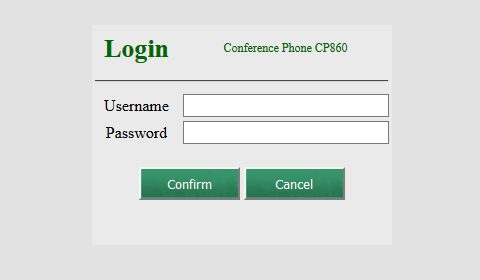
Figure 5: Web Console Login Screen
The username and password should both be "admin". Once you have logged in navigate to the tab titled "Account" and you will see the following "Register" screen. Complete the fields as described in the phone provisioning section above. Once complete, click on the "Confirm" button and the phone should register with your PBX provider.
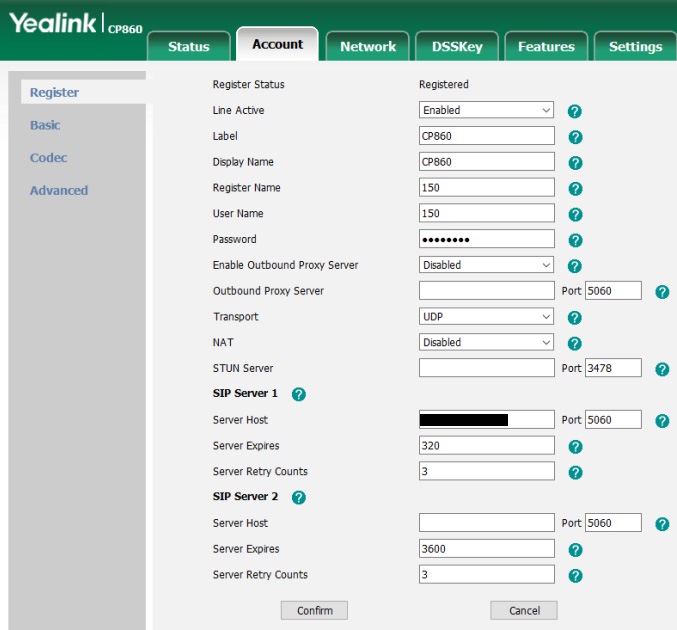
Figure 6: Account Register Screen
NOTE: if you have trouble with registeration and you are confident all of your settings are correct then try going to the "Advanced" screen (link on left side under the Accounts tab) and enable "rport". Click on "Confirm" at the bottom of the screen to complete.
Your service provider may provide the option for auto-provisoning. If you purchase the phone through your service provider then it may already be provisioned and you just need to connect the phone. To auto-provision the phone yourself, navigate to the "Settings" tab and click on the "Auto Provision" link in the left menu. Enter the "Server URL", "Username" and "Password" fields with information provided by your service provider. Click on the "Confirm" button at the bottom. Once complete click on the "Autoprovision Now" button. The phone may reboot at this point but will then try to register with your service provider.
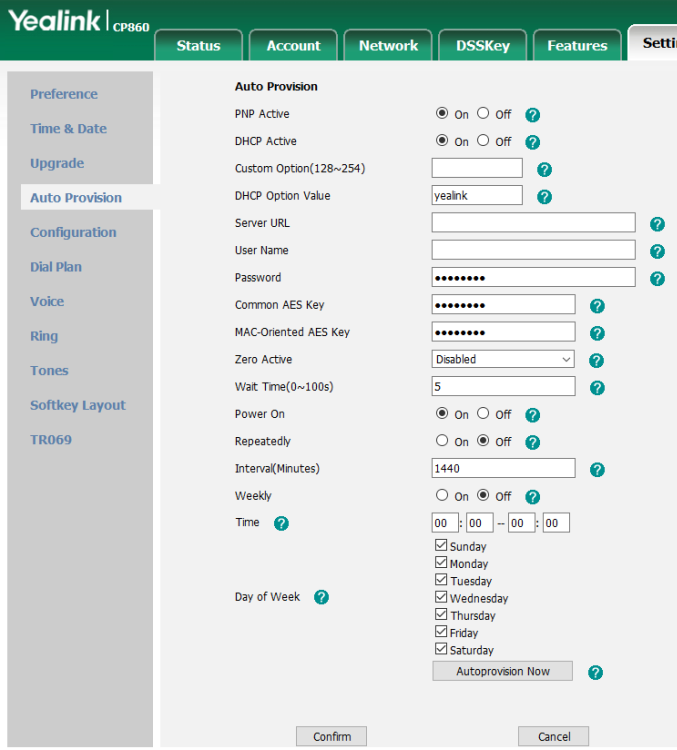
Figure 7: Auto Provisioning Screen
Overall I was impressed with the CP860 as a conference phone. During tests we found that the voice pick up was excellent around an eight (8) foot long table, as well as very clear sound from the speakerphone. With pricing in the $350 range it makes this a great alternative to the more expensive Polycom solutions in the market today.
Published: by WhichVoIP
We're sorry, there are currently no user submitted reviews for Yealink CP860 matching your search criteria at this time. Please add your own review or check back later as reviews are being submitted often.
Disclaimer: The opinions, views and ratings expressed in these reviews are those solely of the reviewer who submitted the review. WhichVoIP does not necessarily agree with any of the expressed opinions, view or ratings.