- Online VoIP Comparisons since 2005
- 26.5+ Million page views: Testimonials
The T49G is Yealink's flagship touch-screen video phone aimed at executives and teleworkers. It is a stylish and professional looking phone with a rich set of features.
Use the tabs below to navigate to various information options.
Take me straight to the 1 User submitted reviews >>
In this review we will focus on the pros and cons of the Yealink T49G along with setup and installation information and how to actually make a video call.
| OVERALL RATING | |||
| Performance | Installation | ||
| Voice Quality | Durability | ||
| Features | Ease of Use |
First of all, the T49G looks very stylish and it is obvious why Yealink is going after executives for this phone. Even if you do not need video, and let's be honest not many of us do, this would look great on any desk and has a very professional and elegant appearance.
On the video front, the phone supports 1080P HD video at 30 frames per second. Full support is provided for the popular video codecs such as H.264, including the high profile version. The camera has a 2 Mega-pixel image sensor which is reasonable, but can be improved by using an external camera connected via the USB3.0 port. The privacy shutter is a nice feature to have, especially if you have configured the video to auto-start during a call. After all, nobody wants to see you gulping down your food just as your video conference call starts.
The 8 inch capacitive touch screen display has a resolution of 1280x800 pixels and looks sharp under standard lighting conditions. The touch screen is a 10 point multi-touch surface and is very responsive. The multi-touch is useful when scaling the video during a call though more on that later. In addition there is an HDMI connector for using an external monitor.
WiFi is built-in to this phone I am pleased to say. Most phones these days tend to be wired ports only and this can be a problem in some offices if there is not an Ethernet connection at each desk. After all, many businesses run from their WiFi networks. Having the option of using WiFi or a wired Ethernet connection is definitely a value add. It also has Bluetooth 4.0 which is very convenient for using headsets or pairing with cellphones.
A total of 16 independent SIP accounts are supported on this phone and also 29 DSS (Direct Station Select) keys that can be configured to suit your needs. For me, this is one of the major advantages of having a large touch screen display. Video is a neat feature but the real advantage of having a large display, in my opinion, is that the phone does not need 50 buttons to access multiple VoIP lines and features. Simply use the touch screen to select the account or feature of interest.
The user interface is very intuitive. You can do nearly everything you need on the phone without having to use a web browser to log into the phone portal and access the full suite of settings.
Dual-port Gigabit Ethernet ports are used on the T49G. This is good for two reasons. First of all, video takes up a lot of bandwidth. Secondly, there is no bottleneck should you use the built-in Ethernet switch and connect to the computer at your desk from the PC port on the phone. Gigabit bandwidth future proofs you for many years to come.
USB ports are provided for additional memory storage and also a USB3.0 port is needed should you wish to connect a higher resolution camera.
On the voice side, the quality is everything you would expect from Yealink. It supports all of the standard audio codecs including Opus.
The display tilts up and down but has no side movement and the camera is essentially fixed to the display on the same plane. This is not too big a deal but having a swivel function for the display and camera may be nice for some users depending on phone placement on their desk.
It would be nice if the video calls could be zoomed to any size using the multi-touch display rather than just three sizes. The display options are sensible but may not meet everybody's preference. Also the video seems to be zoomed horizontally by default so you may look a few pounds heavier.
You can configure the phone for most scenarios without having to log into the device using a web browser. Simply configure the SIP account with the basic credentials and you are good to go. However I do feel that the ability to set the port and protocol (e.g. 5060 and UDP or TCP) on the phone would be a useful addition. I needed to log into the phone portal to adjust these settings.
Finally, I wish they would add a web browser to the phone, that would be really neat. In particular, using an open-source browser that could support WebRTC would provide a larger usable market for this phone potentially. After all, not everyone uses service providers that support video.
At $499, it is reasonably priced compared to other video phones in the marketplace but it certainly is not at a price that would appeal to most VoIP users.
The Yealink T49G is a high-end video phone that has been designed primarily for executives and teleworkers. Although I am not a huge fan of video phones, I do see the benefits especially for larger companies that may have locations across the planet. However, I do like the display size of larger video phones and the touch screen as it removes the need for 50 buttons and extenders.
The user interface is very intuitive to use and the ability to connect over Gigabit Ethernet or WiFi is a great addition. The actual video quality is reasonable but we may have been a little spoiled over the last year or two because of applications such as Facetime on our iPhones, with their super high resolution cameras and displays.
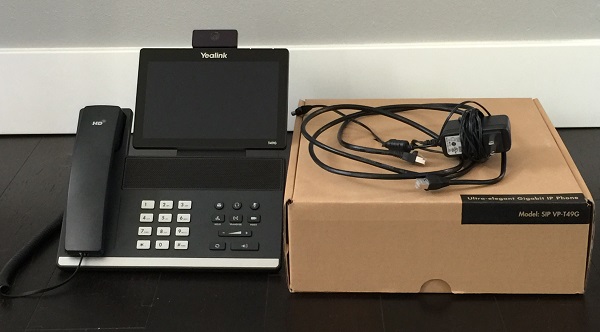
Figure 1: What's in the box
The setup and installation is relatively straightforward for the T49G. In this section I will show you the two main ways to provision the device, from the phone and from the web console. The actual service provider used for this review was Soundcurve, since they support H.264 video calls on their platform and offer excellent customer support when it is needed.
Simply connect the phone as per the quick start guide. If you have WiFi you can use that instead of the supplied Ethernet cable. When the phone is powered up press the menu icon on the touch screen and then the basic icon. Click on the Wi-Fi section and configure it so it will connect to your network, as shown in Figure 2 below.
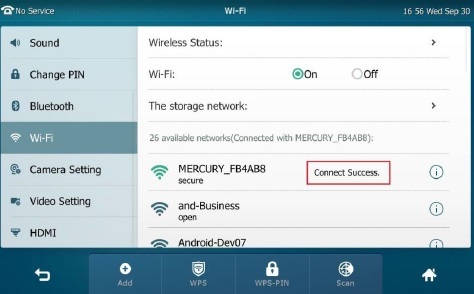
Figure 2: Configure WiFi
One advantage of having a large touch screen display is that it is much easier to configure a SIP account directly on the phone, as opposed to doing this on a regular IP phone which typically has a small display and no keyboard.
Using the touch screen display press the menu icon and then the advanced icon. The initial admin password is just admin. Select the account section on the left and then account1 and enter the details for your service provider. The fields of interest are as follows:
If you have entered the details correctly press save and if successful the account should register with the service provider. You can tell if registration has been successful as the little phone icon will turn solid green for this account on the home screen. It flashes green when trying to register.
If your registration attempts fail when trying to provision the account direct from the phone I recommend you use a web browser to access all of the account settings. For example, you may find that your account needs to be TCP rather than UDP and this option is not available on the phone menu.
Assuming you have successfully connected to your network using WiFi or via a hard wired Ethernet cable, the easiest way to access the web portal is by first finding your IP address. Touch the menu icon and then the status icon. The IPv4 address will be shown. On a web browser simply enter that IP address and you should be presented with a login screen for the T49G.
The initial username and password is admin. Inside the portal, click on the account tab and enter the details for your SIP account. These will be the same as stated in the previous section but you will see a few additional fields, such as transport protocol and port, as shown in Figure 3. The codec and advanced sections provide even more options if you are still having issues. A few pointers on this, make sure the audio and video codecs match the capabilities of your service provider and if problems registering, try enabling rport and turning on keep-alive to notify every 30 seconds as this can often fix firewall related problems.
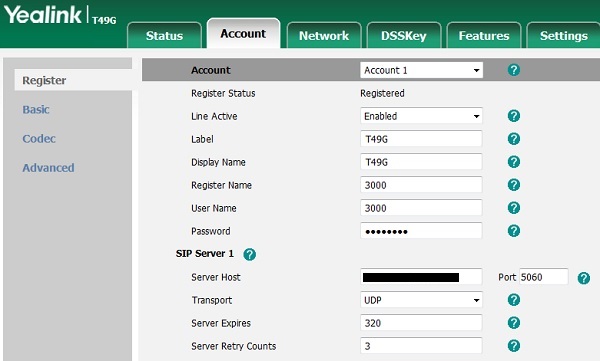
Figure 3: Web Console for T49G
If your provider gives you the option to auto provision the phone, you can do this in the Settings tab, then Auto provision. I did not do this for the purpose of this review though it is not difficult. Simply enter the server url, username and password for the provider's auto provisioning server.
In order to test video calls I used the following products and services:
The Bria client can be purchased from the app store for $7.99. However the video add-on premium feature must also be bought as an in-app purchase and costs $2.99. When the account and extension are configured in the Bria app for the Soundcurve service make sure to enable the video settings in the account specific features section, as shown in Figure 4.
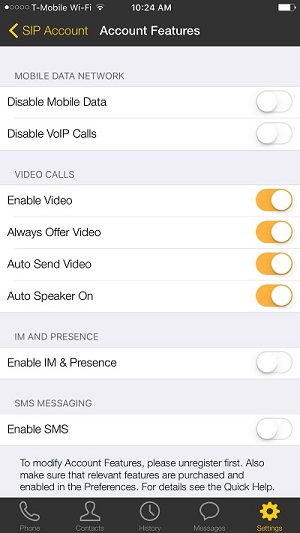
Figure 4: Bria Video Settings
After both extensions registered successfully I simply called the Bria extension from the T49G and full video was displayed on both extensions. My photogenic test subject faithfully posed for the camera, with no doggy treats used as a bribing mechanism whatsoever (Figure 5).
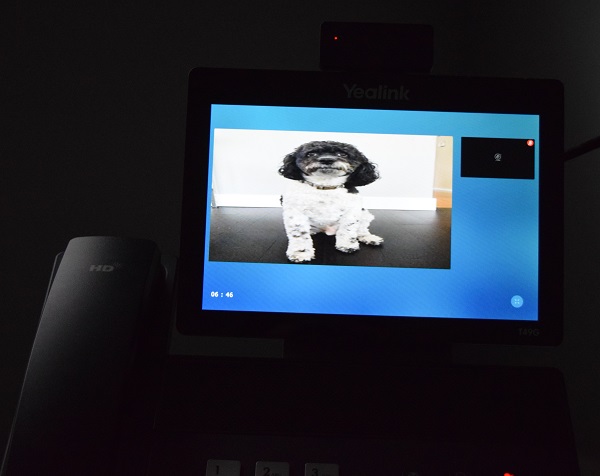
Figure 5: T49G and Bria video call
If you have any questions or comments, please use the Q&A tab at the top of this review. We are always very responsive to our visitors feedback.
Published: by WhichVoIP
Yealink T49G reviews are listed in chronological order.
#1 : MAY 12th, 2016 : Jack
Recommended: Yes
The best part of this phone is the screen. I don't use the video at all but the huge touch screen is awesome. Looks great on my desk too!
Disclaimer: The opinions, views and ratings expressed in these reviews are those solely of the reviewer who submitted the review. WhichVoIP does not necessarily agree with any of the expressed opinions, view or ratings.